Friday, July 27, 2012

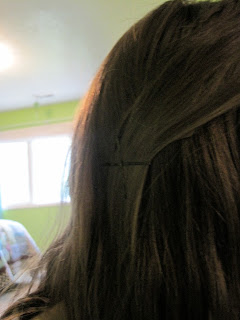
Headband Braid

This is the fifteenth day of my 30 Days of Hairstyles
HEADBAND BRAID

 Take hair from behind your ear and braid it.

 Then bring it over your head and clip/pin it behind your other ear
 Then bring pieces of hair from both sides of your hair and pin them over the area where the braid is.
And it looks like this:
(To learn how I do my beach waves click here)


To return to the 30 Days of Hairstyles click here.

Curly Side Pony

This is the fourteenth day of my 30 Days of Hairstyles
CURLY SIDE PONY
Pull your hair into a somewhat loose side pony tail. Use the leftover curls from yesterday, and re-curl the pieces that have gone flat. 
 let a piece fall out on the other side. (Optional)


To return to the 30 days of Hairstyles click here.

Wednesday, July 25, 2012

Coiled Iron Curls

This is my thirteenth day of my 30 Days of Hairstyles
COILED IRON CURLS
 For this look you need this type of curling iron:
You use it like a regular curling iron with a clamp, but when you twist your hair around the barrel you let it lay in between the coils.
 This type of curling iron is really easy to use because the coils guide the hair into a perfect curl.
When you are done curling your entire head, comb through them will a wide-toothed comb and it will look much better!

Note: All of the curls face the same direction, which looks really pretty, but on the front few pieces on the left side of your face wrap your hair around the bottom of the iron away from your face. 


To return to the 30 Days of Hairstyles click here.


Pinned Back Criss Cross

This is my twelfth day of my 30 Days of Hairstyles
PINNED BACK CRISS CROSS
How to:
First tease your hair to add volume and to keep your hair smoothed back
 Take a small piece of hair from one side of your face and pin it back with a clip or bobby pin (I find that clips stay in much better)

 Next take a slightly bigger piece of hair from  the other side of your head and cover up the other clip with the hair you are now pinning.

From the side you first took hair from take another small section and pin it back covering the other clip and secure with bobby pins.
This look is really fun because it looks complicated, and it looks like you only used one clip or bobby pin. (Except I always use two at the end just to be safe)
From the side


To return to the 30 days of hairstyles click here.

Tuesday, July 24, 2012

Head Band

This is my eleventh day of my 30 Days of Hairstyles
HEAD BAND
This is not something new to learn just slip a headband into straightened hair and you are good to go! It is refreshing and simple if you are doing complicated hairstyles every day.
(Headband - Francesca's Collections)


To return to the 30 Days of Hairstyles click here.

Low Messy Bun

This is my tenth day of my 30 Days of Hairstyles
LOW MESSY BUN

I used the leftover waves from my over night spiral curls that I did yesterday to give it some texture. Messy buns are super simple and easy. It is a great look if you don't have a lot of time. When I do messy buns I twist my hair over and over and pull a pony tail holder over it. Then I tuck in the pieces that are falling out randomly into the pony tail holder. 

To return to the 30 Days of Hairstyles click here.

Overnight Spiral Curls

This is my ninth day of my 30 Days of Hairstyles
OVERNIGHT SPIRAL CURLS 
What you need:
To do this look you need Conair Upward Spiral - spiral rollers and damp hair. It can't be too wet or it won't be dry in the morning! (This is the 18 pack. you can buy them at Target)
1. Wrap about 1 inch sections of hair around each spiral curler. I did the front piece of hair on both sides of my face going away and then every other piece going towards my face. (away, towards, away, towards, etc.) This makes sure that when you take them out, the curls will not stick together and they will look more natural.
2. To secure each piece, bend the curler over your hair on top and bottom. Make sure that it is secured tight and it will stay in all night.
3. When you are done with all of the sections it will look something like this.
4. Sleep on it
5. In the morning unravel the curls and comb through them lightly with your fingers.
Note: The smaller the section of hair you wrap around the curler, the tighter the curl will be. I went for the more wavy look and did a little bit bigger pieces. I have very thick hair and I used 14 for this look. So if you have Thin, regular, or thick hair, the 18 pack will be plenty for all styles.


To return to the 30 Days of Hairstyles click here.

Monday, July 23, 2012

French Braid Around Side Pony

This is the eighth day of my 30 Days of Hairstyles
FRENCH BRAID AROUND SIDE PONY


To do this look, french braid on each side of your head until they meet into a side pony tail. This may take a few tries, I didn't get it right at first. (I'm a french braiding beginner)
 This is very easy if you already know how to french braid. (If you don't know how to french braid watch the video below)
(Credit from shaunellshair on Youtube)

Do the same thing as this video but start at the side of your head and go around.


To return to the 30 Days of Hairstyles click here.

Tuesday, July 17, 2012

Natural

This is the seventh day of my 30 Days of Hairstyles
NATURAL HAIR
(I know that you are thinking it's weird to put natural hair in a list of hairstyles, but if you are always doing a different hairstyle, then your natural hair is a hairstyle too!)
My natural hair is Wavy-Straight. For this hairstyle just do your normal routine without using any flat irons, curling irons, etc.
 My normal routine is putting in the following products when my hair is wet, and blow drying my hair.
  • AVEDA Flax Seed Aloe strong hold sculpting gel
  • AVEDA Damage Remedy daily hair repair
  • AVEDA Smooth Infusion glossing straightener


Rock Your Natural Hair!

To return to the 30 Days of Hairstyles click here.

Fish Braid

This is my sixth day of my 30 Days of Hairstyles
FISH BRAID
Do a fish braid on the side of your head. (or you can do it in the back if you prefer) The best part about fishtail braids is even if it falls out a little bit, it still looks cute! This works for clean dry hair, or second day hair. (I used second day hair)
If you do not know how to fish braid here is a video on how to do it from The Beauty Department (That's a great blog BTW, check it out!)

To return to the 30 Days of Hairstyles click here.

Sunday, July 15, 2012

Tease & Tie

This is the fifth day of my 30 Days of Hairstyles
TEASE & TIE 

1. Tease the crown of your head in 3 layers and smooth back. 
2. Take pieces from each side of your part and twist them to the back of your head. Secure with 2+ bobby pins.

To return to the 30 Days of Hairstyles click here.

High Pony Tail

This is my forth day of 30 Days of my Hairstyles
HIGH PONY TAIL
Put your hair in a high pony tail with straightened hair. Wrap a piece of hair around your hair tie to make it look a little bit more sophisticated.
I teased my bangs just a little bit for volume (Optional)
(Also, I had to bobby pin my bangs because they are just not quite long enough to fit in my pony tail!)

To return to the 30 Days of Hairstyles click here.

Friday, July 13, 2012

Leather Bracelets

My new craft obsession has been making leather bracelets!

These first two I don't have instructions for because they were kind of complicated and random.

 This bow cuff bracelet I got from the blog, Oh the Lovely Things. To View their instructions to make this bracelet click HERE.

 These Next two are pretty simple. I used thin, colored, leather and braided them with 4 pieces like this:
This is how they turned out! 
(I added stick on Jewels to both of them but that is optional.)

To fasten them I sewed a button on one side and stuck it through a loop of the other side.

Have Fun!
XOXO - Michelle

French Braided Bangs

This is my third day of 30 Days of Hairstyles
FRENCH BRAIDED BANGS
1. Blow dry and straighten your hair. 
2. French braid your bangs using very thin pieces and secure with 1 or 2 bobby pins. (I put one bobby pin going up, and one going down)

To return to the 30 Days of Hairstyles click here.

Thursday, July 12, 2012

Cone Wand Curls

This is the second day of my 30 Days of Hairstyles
CONE WAND CURLS
 These Curls are really simple. All you do is wrap the hair around the wand starting from the fat end. (So the end of your hair is on the skinny end)
Just remember to curl every piece every other way. If the pieces go towards your face, then away, and so forth, the curls won't form together.

To return to the 30 Days of Hairstyles click here.

Wednesday, July 11, 2012

Beach Waves

This is the first day of my 30 Days Of Hairstyles. 
VERY SIMPLE BEACH WAVES

You don't have to do something crazy and complicated to get natural looking beach waves. All you need is wet hair and hair ties!


⬆ This is what the finished product looks from the front.⬆
⬇ And here is how you do it. ⬇


1. Shower the night before to start with wet hair. Make sure your hair isn't soaking or it won't be completely dry in the morning. Let it air dry for a few minutes before you start. Depending on the thickness of your hair, braid your hair normally in 2 - 3 braids. (My hair is Very thick so I did it in 3)
2. Go to sleep! (I put a small towel over my pillow so it doesn't get wet)
3. In the morning unravel your braids and comb your fingers through softly. 
You're done! Wasn't that easy?

P.S. I put these products in my hair before I braided it when it was wet but this is completely optional.

To return to the 30 Days of Hairstyles click here.

30 Days of Hairstyles Start

The other day I was thinking about how I never do my hair. I always just leave it straight. That is such a waste because I know how to do lots of hairstyles! So I created a list of hairstyles that I know how to do and arranged them in an order so they all correspond with each other. So I decided that I will do each hairstyle in a row, and then when I finish, I will just repeat the cycle! This way, I never wear the same hairstyle too often, I will always be changing it up, and I will never be lost in wondering how I should do my hair.
Now all of these hairstyles are pretty simple, and you probably already know how to do some of them, but I will be putting them in an order that really works for me, and hopefully you too!
I will post the process of each hairstyle for 30 days, and when the thirty days are up I will put them all together in one post.
The first hairstyle will be up soon and thanks for reading!
XOXO - Michelle